Monday, September 24, 2012

DIY: Grain Sack Camera Bag

So, while shopping at the Springfield Extravaganza a couple weekends ago, my mom picked up some awesome grain sacks from an old farm in Indiana. Before I left, she let me have one. I new what I wanted to do with it right away. 

I wanted an awesome handmade DSLR camera bag for my Olympus e-500! AND it turned out fantastic. 


It turned out wonderful! I love it. I was able to figure out how to sew the padding into the bag, so its nice a comfy fit for my camera. Below is a totally photo dump...

Front of the bag with the flap lifted up.


Looking into to the bag. The bottom and sides are padded with inch thick pieces of padding. I then covered them in a linen like material I got at JoAnn's for $2.99 a yard. Not sure what the name of the material is, but I use it for everything. I even made curtains once at our old house.

Anther shot of the inside of the bag. It fits my camera with lens attached and has room for an additional space for another lens or some cords and chargers. 

Side of the bag, shows how I attached the strap with a square and then corner to corner stitches. I felt like this secured the strap best. 
More than enough space, with room to spare.


Its the perfect size and is as lightweight as a camera bag with a huge camera in it. Its less cumbersome and bulky as some other bags I have seen, but offer plenty of safety and padding.


Linking up with the following:
Overflowing with Creativity 
Coastal Charm
BNONP Metamorphosis Monday
Primp: Primp Your Stuff
 

Wednesday, September 5, 2012

Living Room: Progress

There has been a lot going on in the last 3 weeks! So far we have made only cosmetic changes but they have made a big impact! I have painted a ton! Kitchen, living room, game room, hallway and half bath have all seen an update with paint. 

When we had the home inspection, I took the following photos:


The dark brown walls with dark accessories wasn't our style at all. It felt heavy and outdated.  With a change in paint and eliminating dark furniture I feel like the living room looks and feels lighter and brighter.  


We kept the same basic layout with our furniture as they had due to the location of a TV wall mount bracket and special chute that will hide all the wire once we update our TV. And now for the reveal of our current living room. 

The wall color is Summit Gray by Sherwin Williams. I am leaning towards yellows, aquas and navy as accent colors to bring some pop to the room. I am currently shopping for the perfect rug to break-up the gray couch and grayish tan carpet. Picture overload below!

 Looking into the living room from the hallway


 Curtains are actually a queen duvet cover from Target. I cut it in half and hemmed taped the raw edges. I like have the gray backing to provided some thickness to the curtain which helps it hang better. 

 Looking into the living room from the kitchen back door.

 Looking at the living room straight-on from the kitchen.

 The empty wall space next to the sofa will hopefully get a low dresser or fun sideboard soon. I have been shopping online some but nothing is really striking me yet. I picture an antique style dresser that bows out slightly across the front. 

We also need to start thinking about hanging some art work up on the walls, but I am waiting for all major furniture pieces to fall into place first. The art work over the fire place is a favorite of mine, but it isn't making a big statement, so eventually that piece will find a home somewhere else in the living and something with a larger size will take its place. 

I am also shopping for a great rug too. Below are some options that I am considering.


I want something that can withstand our family and let us really live on the rug. It needs to balance the room as well. Additional color will be add through art work and pillows.  Eventually I would like to also add an ottoman or padded bench in front of the couch. It would add an additional comfort level to the room. 

For now, I am very happy with how the room is turning out. It feels modern and fresh. I need to continue to add some layers, such as rug, pillows, and throws that will increase the cozy feel that I hope to achieve.  The TV stand will be changed out and the empty wall space beside the couch needs something. I am hoping to find something rustic and worn, that will give the collected over time look!


Friday, August 24, 2012

A Game Room for the Boys

So, I thought I would focus on getting the kitchen and living room combo completed first, BUT with so much kid-friendly traffic through the house, I turned my attention to the den/game room first. This space gives the boys a spot for them to hang out with their friends and each other. 

I wanted the space to be fun, but still work with the rest of the house. I let the boys pick an accent color, and they settled on Wet Coral from Lowe's. Its a red/orange. I used Gray Summit from Sherwin Williams throughout the kitchen/living and had a lot left over. So I took that color into the Game Room as well. 

First, lets check out the before shots:


This is looking into the room from the front door. This is actually my favorite room in the house. I love the bookcases and french doors. 


The den is very open into the entryway. I wanted the room to flow with the rest of the house, but still be obvious that its a kids space.

 
The room had potential but was very blah! Just not our style at all! We wanted some personality and for the room to really pop. I have some ideas to add some additional details to the room, but that is going to have to wait awhile. 

Now, for the AFTER shots! 


Standing at the front door looking into the room! Wall color is Summit Gray (Sherwin Williams), and the bookcase backsplash is Wet Coral (Olympic). Now that is a statement wall! The black and white  picture above the couch is from Ikea and was my brothers. He let me have it for the boys space. I think it works so well. Love the added pop of yellow.


The cabinet holds a tv, wii, dvd, etc. I have a really cool idea for a marquee sign above the tv cabinet. The tan walls beyond the stairs will eventually get a coat of paint as well.Probably Gray Summit as well, but I may go with an accent color instead. We'll have to see.


Looking at the other side of the room. I am still shopping around for some cool curtains to help balance the other side of the room. I may also paint the tan rug, but for now I am liking the additional texture it adds to the room. The window between the windows is a chalkboard, I thought the kids would enjoy leaving messages. 


I still want to add details throughout the space. I am thinking of collecting some vintage globes to display along the top of the built-in, or maybe something more "game room". I have lots of ideas for some cool diy projects, but for now this space is done. I have so many other rooms to complete, and the boys' bedrooms have their beds set up and that's it! 

A final before/after side-by-side!


Linking up to these parties:

Wednesday, August 22, 2012

We have moved!

Finally! After a couple delays and lots of detail changes, we completed the move. This Friday it will be two weeks.  

And during those two weeks, we have had a plumber twice for a leaking kitchen faucet, the pool man for the gushing hot tub, and now we are into day 2 of a 6 day roofing project. All of these were supposed to be completed before we took possession. And school started last Monday and its been a couple of crazy weeks.

But along with all the maintenance projects, including some updating projects that I am super excited about. So far I have painted the kitchen, living room and hallway in Summit Gray (Sherwin Williams). I painted bathroom off the hallway Peppercorn ( Sherwin Williams). I am currently painting the Den (boy's playroom). I am using Summit Gray in there as well but adding pops of color on the bookshelves and plan on creating a super cool Marquee Letter "P". 


Nothing super exciting, but here is a picture of the roof in progress. We have a brown tone roof and opted for the onyx black. It will really tie into the shutters and front door once we get those painted later this fall.

Friday, July 27, 2012

Laid-Back Boys Room: Adding Some Beachy Details

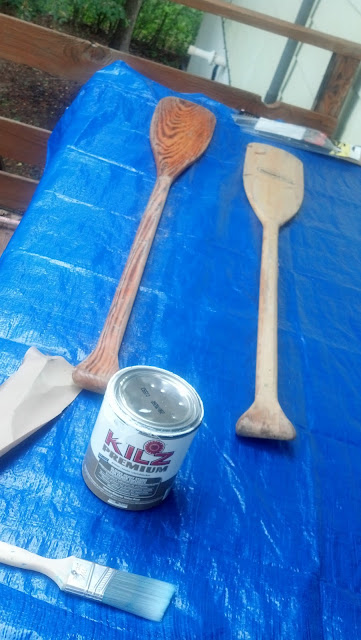
I have had these old boat oars sitting in our garage FOREVER. They are actually from our old boat. I knew I would eventually use them for something, I just didn't know when/what. And when our youngest picked out this picture for his new bedroom, I knew I would add them to his room.


We found this painting at Garden Ridge and it became the entire inspiration for his Boys Surfer Room.  Its HUGE. I can't wait to get it put up in his room. Though he has also started asking for some rock-n-roll stuff to be added as well. Not sure how that is all going to tie in together.

In the mean time, I have been working on some beach related details for his room, including the oars!


Here they are in their natural state...not much to look at!

I used some Kilz Primer, and it actually seemed to work against me in the end. It made the distressing part very difficult. After the primer, I used just a base white flat paint I had in the garage. 


Then, I picked thru various colors and settled on an aqua/green combo and aqua/yellow combo. I used a little red to add some fun personalized details for my son.

I just randomly started painting stripes, sporadically down the oar. I free handed the lines and didn't worry about getting anything perfect because I knew I would be distressing them. I started with my green and then added the aqua color.


From this point on I quit taking progress shots. I was working on these outside in between various storms that we had throughout the weekend. The second oar was finished along the same plan. Random stripes painted on the oar. 

And now its time for some finished shots;


They are just sitting in my son's now packed up room. They do not exactly match the pinky beige walls, but its the best at this moment. 


He choose the number 5, because that is how old he is right now. I also add his initials, RP.


They are so awesome! I love how they turned out. I think they will add fun details to his room along with some pops of color on his walls. I have not decided how I will use them just yet, but I thought maybe using them as curtain rods. Though, a good portion of them would be covered up, so I may mount them in the space above the curtain rod instead. 

The move is only days away. We are so excited to get in, do some painting then start moving our stuff in! The boys are very excited about their rooms. 

So, what do you think of the oars? 

Linking Up to the Following Parties:

Thursday, July 19, 2012

Refinishing Old Table into Outdoor Patio Table

When we moved almost two years ago, a family member gave us an old Ethan Allan trestle table and 6 six chairs. The table was solid but in rough shape. The top had HUGE gouges all the way across. The chairs had been trimmed shorter, but were oddly low when you sat in them. They didn't last very long before they started falling apart. 

We tossed the chairs, put the table in the basement and bought a new dining set. Then I sanded the table and painted it for outdoor use. Then it sat on the back deck, unused for at least a year. 

This is what it looked like a couple days ago, after I cleaned it off:


The legs are my favorite part of the table. I am leaning towards leaving the bottom half painted. I will keep the white paint for now, but may change to a different color for an added pop of color once we get settled in and the whole area starts to come together. 

The sealer I used turned the white paint an ugly yellowish color. There were rust spots in various areas of the table, and a stray cat has been living underneath the table for a while. 

But it has potential! And instead of building a new table, like I discussed here, I decided to try reusing our current table.The idea of a refinishing a table for outdoor use has been something I have wanted to try for awhile. I hope through refinishing the old dining table I will achieve that timeless, worn look. A table that has been around for generations.

So yesterday, I cleaned it off and started with a quick sanding, followed by a layer of Citristrip Stripping Gel.  I worked in sections because of the extreme heat. But it still didn't take me too long. 


After the first layer of gel was removed from table, I started to see the potential of a fun farmhouse style table that would be perfect on the new patio at the new house.


I started sanding the table, but realized the first layer of stripping gel only removed the paint. The shiny finish of the original table treatment was still intact. So I spread another layer of gel across the top and sides again. 


As I started to removed the second layer of gel, I really noticed the nice wood grain and warm color of the natural wood. 


For the next couple of hours I sanded! First, I wiped the entire table down with a bleach cleaning solution to make sure I had all the stripping gel was removed. Then I started with 60 grit sandpaper. Next I used 100 grit, then 150 grit and then I finished up with a super smooth 220 girt sanding. With the final sanding I went very slow, along the wood grain. I focused on all the areas with imperfections like those below:


So for a day and a half of work, I finished up tonight and its looking like this:


I LOVE the table! It looks so much better than I had even hoped. The top still has lots of imperfections, and I may have used my sander against the grain in some areas, but I think it just adds to the character. 


I have not decided on what type of stain I am adding, if any at all. I will need to re-seal the table to protect against moisture and everyday use, but I am loving the soft natural wood look with the white legs. If I do actually use stain, it will be something that just adds a richer tone to the natural wood. Whatever I do, I want to avoid anything that will give it an orange tone. 

Tomorrow I will follow up with a proper staging of the table. But for now my back says its time to relax! 

If anyone has any suggestion on what to seal the table with or an idea for stain I would love to hear from you! 

Linking Up To:

Fabulously Creative Friday
Transformation Thursday @ The Shabby Creek Cottage 
Primp 
Furniture Feature Friday's - Miss Mustard Seed
Cowgirl Up! The Farmhouse Porch